In the first of this series, we started learning how to construct a cross-platform app by creating Weather.Common – a simple app that allows you to get weather apps direct to your phone or device. The rest of the tutorials are concerned with how you can adapt Weather.Common to different types of device – including iPhones and Android phones.
In this stage, we’ll learn how to create a Windows 10 universal app that can run on phones, tablets and desktop. Let’s get started!
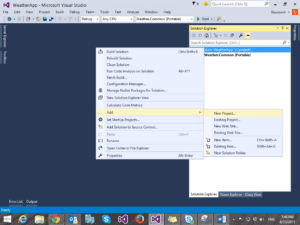
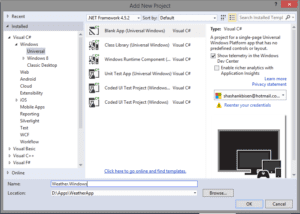
Step 1: To begin, you need to add a new universal app project to the solution. The screen shots below demonstrate how you can do this.
 |
 |
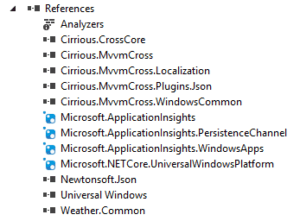
Step 2: Next, you add a reference to your Weather.Common project and the following dll’s.

Step 3: Delete MainPage.xaml and add a class DebugTrace for tracing warning and errors.
public class DebugTrace : IMvxTrace
{
public void Trace(MvxTraceLevel level, string tag, Func message)
{
Debug.WriteLine(tag + ":" + level + ":" + message());
}
public void Trace(MvxTraceLevel level, string tag, string message)
{
Debug.WriteLine(tag + ":" + level + ":" + message);
}
public void Trace(MvxTraceLevel level, string tag, string message, params object[] args)
{
try
{
Debug.WriteLine(string.Format(tag + ":" + level + ":" + message, args));
}
catch (FormatException)
{
Trace(MvxTraceLevel.Error, tag, "Exception during trace of {0} {1} {2}", level, message);
}
}
}
Step 4: Now add a class called Setup.
public class Setup : MvxWindowsSetup
{
public Setup(Frame rootFrame) : base(rootFrame)
{
}
protected override IMvxApplication CreateApp()
{
return new App();
}
protected override IMvxTrace CreateDebugTrace()
{
return new DebugTrace();
}
}
Step 5: Replace the OnLaunched method in App.xaml.cs
protected override void OnLaunched(LaunchActivatedEventArgs args)
{
var rootFrame = Window.Current.Content as Frame;
// Do not repeat app initialization when the Window already has content,
// just ensure that the window is active
if(rootFrame == null)
{
// Create a Frame to act as the navigation context and navigate to the first page
rootFrame = new Frame();
if(args.PreviousExecutionState == ApplicationExecutionState.Terminated)
{
//TODO: Load state from previously suspended application
}
// Place the frame in the current Window
Window.Current.Content = rootFrame;
}
if(rootFrame.Content == null)
{
// When the navigation stack isn't restored navigate to the first page,
// configuring the new page by passing required information as a navigation
// parameter
var setup = new Setup(rootFrame);
setup.Initialize();
var start = Cirrious.CrossCore.Mvx.Resolve();
start.Start();
}
// Ensure the current window is active
Window.Current.Activate();
}
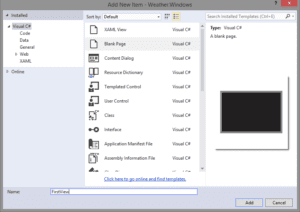
Step 6: Add a folder called Views to the solution and then add a blank xaml page (FirstView.xaml) to this folder.

Step 7: Replace the content of the FirstView.xaml with the content below.
<views:MvxWindowsPage
x:Class="WeatherWindows.Views.FirstView"
xmlns="https://schemas.microsoft.com/winfx/2006/xaml/presentation"
xmlns:x="https://schemas.microsoft.com/winfx/2006/xaml"
xmlns:d="https://schemas.microsoft.com/expression/blend/2008"
xmlns:mc="https://schemas.openxmlformats.org/markup-compatibility/2006"
xmlns:views="using:Cirrious.MvvmCross.WindowsCommon.Views"
mc:Ignorable="d">
<Grid Background="{StaticResource ApplicationPageBackgroundThemeBrush}">
<Grid HorizontalAlignment="Center" VerticalAlignment="Center" Margin="100">
<Grid.ColumnDefinitions>
<ColumnDefinition Width="100" />
<ColumnDefinition Width="100" />
</Grid.ColumnDefinitions>
<Grid.RowDefinitions>
<RowDefinition Height="*" />
<RowDefinition Height="*" />
<RowDefinition Height="*" />
</Grid.RowDefinitions>
<TextBlock Text="City : " VerticalAlignment="Center" FontSize="18"
Grid.Column="0" Grid.Row="0" />
<TextBlock Text="Date : " VerticalAlignment="Center" FontSize="18"
Grid.Column="0" Grid.Row="1" />
<TextBlock Text="Temp : " VerticalAlignment="Center" FontSize="18"
Grid.Column="0" Grid.Row="2" />
<TextBlock Text="{Binding DailyTemperature.City}" VerticalAlignment="Center"
FontSize="18" Grid.Column="1" Grid.Row="0" />
<TextBlock Text="{Binding DailyTemperature.ShortDate}" VerticalAlignment="Center"
FontSize="18" Grid.Column="1" Grid.Row="1" />
<TextBlock Text="{Binding DailyTemperature.Temprature}" VerticalAlignment="Center"
FontSize="18" Grid.Column="1" Grid.Row="2" />
</Grid>
<Grid VerticalAlignment="Bottom" Margin="100">
<Grid.ColumnDefinitions>
<ColumnDefinition Width="100" />
<ColumnDefinition Width="*" />
<ColumnDefinition Width="100" />
</Grid.ColumnDefinitions>
<Button Command="{Binding PreviousCommand}" HorizontalAlignment="Left" Grid.Column="0"
IsEnabled="{Binding IsPrevious}">Previous</Button>
<Button Command="{Binding NextCommand}" HorizontalAlignment="Right" Grid.Column="2"
IsEnabled="{Binding IsNext}">Next</Button>
</Grid>
</Grid>
</views:MvxWindowsPage>
By doing this, you have now created a page which shows the city name, date and temperature on that date, along with two buttons to navigate between previous and next day’s temperature. And you’re done! You’ve created your first cross platform app for Windows 10. You can now run the project.
Of course, for a truly universal app, you’ll probably want to include other operating systems as well. Look out for my next tutorial, in which I’ll show you how to create the app for Android.


