
Introduction
Much time and effort goes into developing the "ultimate task sequence". The first true test of that claim is during a pilot, as you venture into the unknown.
Real-world Scenario
One such situation was during a large-scale OSD project, where the customer provided a handful machines to test with. A few of the deployments failed at the start of the pilot for various reasons. Others completed the deployment, but with non-standard configurations like multiple partitions. Additional machines were provided to continue with the pilot, but same results.
After further investigation, the failures were caused by one or more of the following conditions:
- Unsupported hardware models
- No wired network connections
- USB drive connected
- Laptops running on battery
A new set of machines were provided, trusting that the customer would provide machines which met the following requirements:
- Only supported hardware models would be provided
- Wired network connection
- No USB drives attached
- For laptops, AC power connected
Having learned from the previous pilot attempts, we wanted to "…trust but verify" the machines configurations.
Sure, visiting each machine prior to the deployment would provide some reassurance, but that labor and time intensive process would be difficult to maintain. Deployment readiness reports were also used to verify machine configurations. This was good because reports are generally a reliable source of information for these scenarios. Reports are ad-hoc in nature. However, they are primarily based on inventory cycles being executed, with increased chances for inaccuracies. Consequently, there grew a need to adopt an even more reliable verification process, having the verification process run in real-time during the deployments.
So why is this important?
If a non-standard configurations or environmental condition would ultimately doom the OS deployment to failure, the deployment should fail "safely" and before the point of no return e.g. before the disk is formatted or Apply OS image step executes. If the deployment fails after either of these steps execute, there's very little chance – if any -, for recovery. Essentially, the computer is "bricked", requiring a desk side visit…and possibly data loss.
Failing a deployment "safely" should be a desired goal for any deployment scenario. When deployments are failed safely, the computer can be quickly returned back to its original state before the start of the deployment.
So how do we do this? Pre-Flight Checks!!
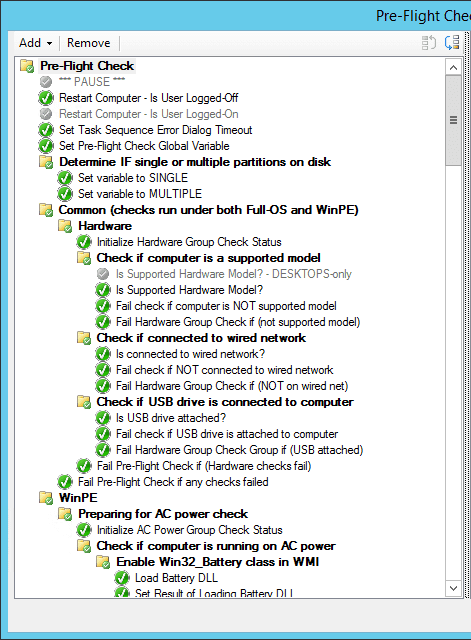
Pre-Flight Checks are a group of task sequence steps used to detect non-standard computer configurations and environmental conditions. Their goal is simply to fail the deployment "safely" when undesired configurations and environmental conditions are detected.
| TOP part of Pre-Flight Check Group | BOTTOM part of Pre-Flight Check Group |
 |
 |
Deep-Dive into the Pre-Flight Check task steps
Let's take a look at some of task steps which make up the Pre-Flight Check group:
| (selected) Check or task step | Description | Custom Action or Type | Properties | Options |
| Checks to see if no users are logged-on to the computer. If logons are detected, then the computer is rebooted and the deployment continues after | Restart Computer |  |
 The explorer.exe process is always running when a user is logged-on to a computer, even users connected over RDP. So as long as explorer.exe process is NOT running, then no users are logged-on to the computer. Also, the task step should only execute in a full-OS e.g. not in WinPE. The primary benefit to restarting the computer, is that it ensures no files are locked or in-use when USMT Capture is executed e.g. Scanstate.exe |
|
| Determine if primary fixed disk has a single partition | Set Task Sequence Variable |  |
 |
|
| Determine if primary fixed disk has multiple partitions | Set Task Sequence Variable |  In the early days of Windows XP deployments, it was the practice of some to create multiple partitions – C: operating system, D: user data. It made some sense, but in many cases, it led to wasted unused disk space. Fast-forward to modern times with much larger hard-disks, many are abandoning the multiple partitions standard for single partitions. However during REFRESH deployments, formatting the disk is generally not desired, especially since it is preferred to use hardlinking during user-state captures. In order to eliminate multiple partition configurations on a system, user-state capture needs to off-load user data to a peer machine using 1E Nomad Peer Backup Assistant (PBA) – or a ConfigMgr State Migration Point (SMP) -, so the disk can be formatted. However, this practice should be treated as an exception and used only when the disk has multiple partitions. This Pre-Flight Check will determine if the disk has multiple partitions, setting the task sequence variable NumberOfPartitions=MULTIPLE. With the variable set to MULTIPLE, particularly during a REFRESH prior to USMT Capture, the hard-disk can be formatted conditionally and not formatted if the variable is set to SINGLE. |
 IF
AND
|
|
| Prevents deployments on unsupported computers | Set Task Sequence Variable |  |
 |
|
| Checks to see if computer is connected to wired network | Set Task Sequence Variable |  |
 This one is tricky. You actually need to know the names or part of the names of the adapters on the supported computers. The good thing is that you can put them all in the WHERE clause and using the LIKE operator. To get a list of all network adapters inventoried, run the report Count network adapters by type |
|
| Check to see if USB drive is connected to computer | Set Task Sequence Variable |  |
 This helps to assure the task sequence folder will only be created on a fixed drive. This will also prevent any chance of boot partition or OS Image from being placed on an external hard drive. The step essentially detects if the USB drive is an "external hard disk", rather than just a flash drive which gets registered in WMI as "Removable Media". So if this task step was included with a task sequence used to do OS deployments with USB flash drives/sticks, it will work just fine. |
|
| Prepares the AC power check in WinPE | Run Command-line |  This runs under WinPE. To prepare to see if computer is running on AC power, you much first load the Battery DLL, which then loads the win32_battery class in WMI. Rather than wait for the Deployment Toolkit to be downloaded so that the Gather step runs and the IsOnBattery task sequence variable is available, you load the Battery DLL and then later run the WMI query against the win32_battery class. |
 |
|
 |
Executed the AC power check in WinPE by attempting to execute a WMI query against the win32_battery class | Set Task Sequence Variable |  |
 …means the computer is running on AC power e.g. power cable is plugged-in. …means the computer is running on AC power e.g. power cable is plugged-in. |
| While in full-OS, checks to see if computer is running on battery and fails the check if it is. | Set Task Sequence Variable |  |
 |
How do you create a Pre-Flight Check task sequence?
The long and hard way is to start from scratch…but I have something better. How about creating and perfecting it once, then making it a "template" so that it can be (re)used and shared with others?!?!
My good friend Mike Terrill – 1E Product Manager – has created a fantastic blog with instructions on how to do it: Creating Your Own TS Templates…check it out!!
To help accelerate things for you, a Pre-Flight Check task sequence template has already been created. Just follow the instructions below to get started:
- Download the template giving it your own filename (e.g. <filename>.xml), and saving it to the location/directory where MDT is installed (e.g. <MDT install-directory>\SCCM)
- If the ConfigMgr Admin console is open, close it and then reopen e.g. this is required so that the new task sequence template can be read from the folder
- Navigate to Software Library -> Operating Systems -> Task Sequences
- Right-click Task Sequences and select Create MDT Task Sequence…you should now see the Pre-Flight Check template named Client Task Sequence – with Pre-Flight
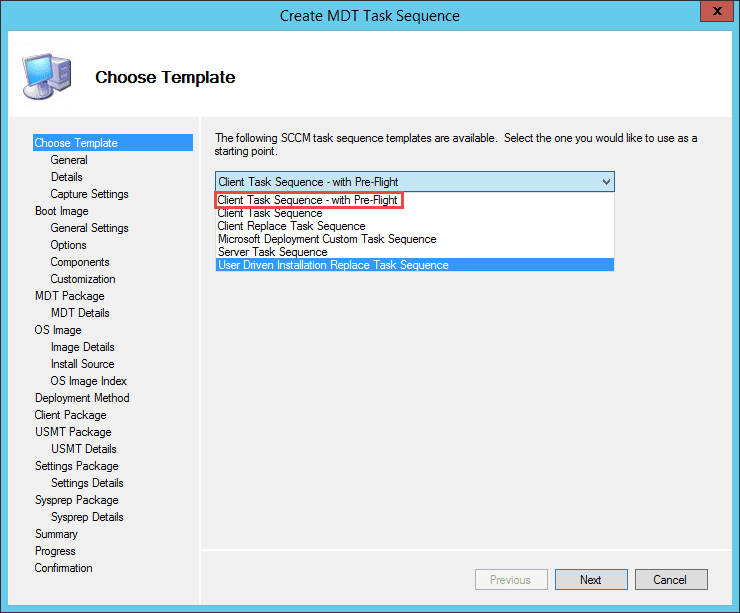
- Continue with the wizard, configuring the remainder of the task sequence options
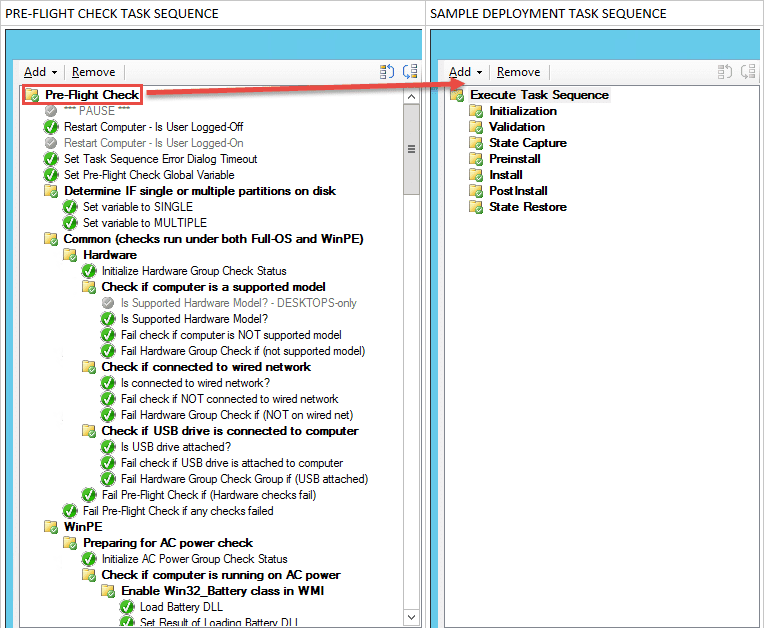
- You should now have a new Client Task Sequence with the Pre-Flight Check group at the top
- To integrate the Pre-Flight Check group into an existing deployment task sequence, just copy the group from the newly created Pre-Flight Check task sequence – and with your deployment task sequenceopen -, paste the group at the very top of top of the task sequence open -, paste the group at the very top of top of the task sequence
- Update the conditions on the Check if computer is a supported model action as appropriate for your environment
- Update the conditions on the Check if connected to wired network as appropriate for your environment
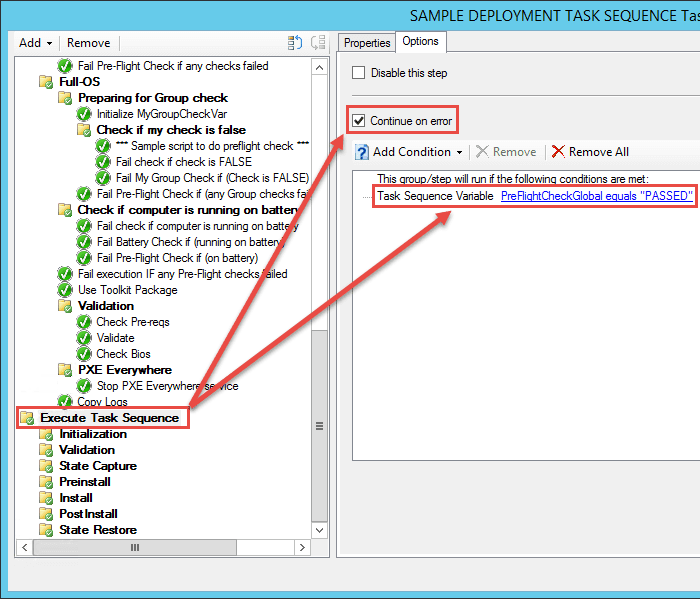
- Finally, select the Options tab of the Execute Task Sequence group Check (enable) Continue on error Create a Task Sequence Variable condition
- Name: PreFlightCheckGlobal
- Equals
- Value: PASSED
Note: This makes it so that the Execute Task Sequence group will only execute IF all of the Pre-Flight checks passed (e.g. successful).
So that's it!! You should now be able to edit your deployment task sequence, reviewing the Pre-Flight Check group and adding further customization with your own custom pre-flight checks.
My next blog post will explain:
- Structure and Flow of the Pre-Flight Check group
- Use of the task sequence variables in the Pre-Flight Check group


