
Introduction from 1E
At MMS this year, 1E announced and demonstrated a solution that enables the switch from BIOS to UEFI to be automated in a single Task Sequence, using custom Task Sequence steps that incorporate all the intelligence to manage the various different settings for Dell, Lenovo and HP systems. You can see the 1E solution in action in this webinar recording. It’s just one of the capabilities of the 1E Windows 10 solution that includes peer-based content distribution, PXE and storage of user state, plus intelligent application installation. There are alternative BIOS to UEFI solutions that have been developed by the community, and as a supporter of the community 1E are happy to share this alternative method developed by Johan Schrewelius and Jorgen Nilsson for comparison.
This solution has been created and tested by a colleague of mine Johan Schrewelius, he has done most of the work so I cannot give him enough credit for this. We have been using it for a while now and it works great!
1. Background
The release of Windows 10 in combination with steadily increasing security demands means an operating system upgrade, or fresh install, today also includes security measures that not long ago where sort of luxury or only experimental.
Two major such are UEFI and Secureboot; a significant challenge as not even Configuration Manager 1602 supports a seamless transformation from Legacy Bios to UEFI.
This post describes our method of achieving the desired; one (1) Task Sequence that starts in Legacy mode and results in an UEFI configured computer with Secureboot enabled. A script and files for configuring HP computers have been included as example.
To implement our solution, you need to download Legacy2Uefi from HERE as well as TSEnv2.exe from 1E (https://info.1e.com/website-freetools-1e-tsenv2) 1E has been generous enough to share this powerful tool with us, and we cannot thank them enough.
1E also presented and demoed a really cool solution for making the switch from Bios-UEFI at MMS 2016 which will take all the complexity out of this task. Today making BIOS changes for HP and Dell for instance requires in many scenarios multiple versions of the tools used, as different versions works for different models, 1E's solution will take care of all that, so be sure to check it out.
2. Obstacles
There are two major obstacles that prevents us from achieving our goal using a standard TS.
Firstly, we will not be able to apply a boot-image nor an operating system to a GPT disk on what is detected as a MBR System.
Secondly, if we (which we nevertheless will do later) apply bootable media to disk by running a script we will not be able to restart the computer in a controlled fashion as built-in controls (smsboot.exe) will prevent this based on inconsistencies in TS configuration, i.e. the TS-variable “_SMSTSServiceStartType” not being set to auto, which is required to allow rebooting to an installed operating system. Unfortunately, this variable is read-only and we cannot modify it using supported means. But what if we use unsupported means……
3. Read-only TS-variables < TSEnv2.exe
It is usually not recommended to use unsupported means; this however could be the time when circumstances call for it? TSEnv2.exe is able to modify read-only TS-variables and since that is what stands between us and a successful Legacy to UEFI transformation, that’s exactly what we are going to do.
TSEnv2.exe comes in both 32- and 64-bit versions, it is also depending on native Configuration Manager libraries, at lease tscore.dll. This makes it reasonable to include it in our boot images using OSDInjection.
4. OSDInjection
To include TSEnv2.exe in already existing, as well as in new, boot images do the following on the primary site server or CAS that “owns” the images.
- Localize your ..\OSD\bin directory.
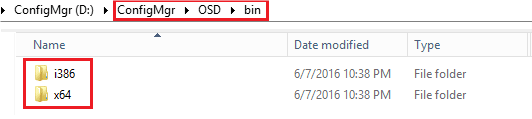
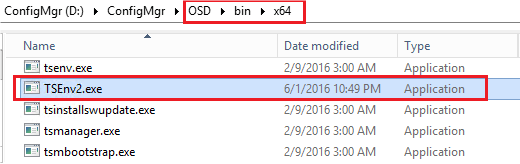
- Copy the corresponding version of TSEnv2.exe to the x64 as well as the i386 subfolder.
- Once the files have been copied we need to tell ConfigMgr to actually include them the next time an image is created or updated. This is done by editing “osdinjection.xml” which is found in ..\bin\x64:
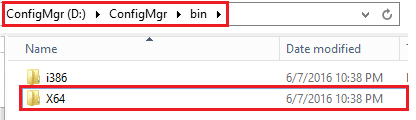
Remark – there’s only one osdinjection.xml, not one per architecture
Remember to Backup osdinjection.xml before editing.
osdinjection.xml holds the “recipe” for boot images and needs to be supplemented with information about the new files.
Open osdinjection.xml in notepad or similar.
As we know there’s already a native file with similar name (tsenv.exe) we will search for that and copy the section, thus avoiding misspelling.
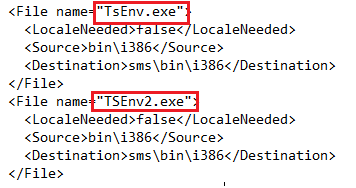
First hit when searching should give you this:
<File name="TsEnv.exe">
<LocaleNeeded>false</LocaleNeeded>
<Source>bin\i386</Source>
<Destination>sms\bin\i386</Destination>
</File>
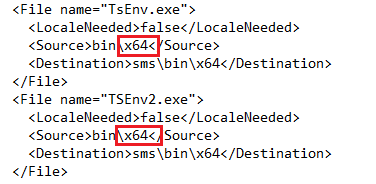
Copy (duplicate) the section and replace the file name:
<File name="TSEnv2.exe">
<LocaleNeeded>false</LocaleNeeded>
<Source>bin\i386</Source>
<Destination>sms\bin\i386</Destination>
</File>
The result should look like this:
Repeat for x64 (second hit when searching for tsenv.exe):
Save and close osdinjection.xml. Next time a boot image is updated on distribution points TSEnv2.exe will be included.
5. Bootable media Package
As stated earlier we will apply bootable media to disk by script, therefor we will need to create a package containing the necessary files. Use the same procedure as when creating bootable media for use on a USB boot stick, then mount the iso-file and copy the entire content to a new folder on your package share.
Remark – you cannot reuse an old iso; it has to be “fresh” with TSEnv2.exe included.
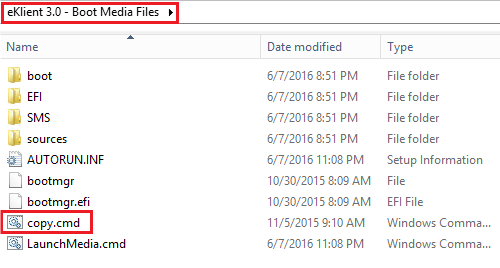
Make sure to also include “copy.cmd” from Legacy2Uefi.zip.
Create a package in ConfigMgr from the folder, do not create any program.
6. Task Sequence
At this point boot images should be updated and include TSEnv2.exe. We should also have a new package including the small copy.cmd command file. The rest of the work is done in the TS-editor, let’s start….
6.1 Create a new group
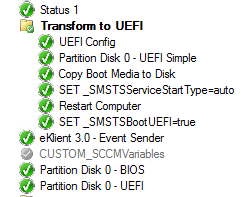
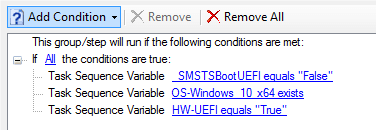
Create a new group, call it “Transform to UEFI”.
In our case we have a few extra conditions but as a minimum you should check that the machine isn’t already configured for UEFI (_SMSTSBootUEFI equals False).
The steps within in the group will be explained over the next couple of sections.
6.2 TS Steps
6.2.1 UEFI Config
This step will have to be adapted to local circumstances. It’s simply an example that shows how to reconfigure a HP Laptop to UEFI mode.
Legacy2Uefi.zip contains a folder with only two files:
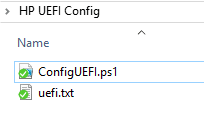
ConfigUEFI.ps1 is designed to utilize HP’s Bios Configuration utility, which is not included.
uefi.txt contains a minimum of settings to configure UEFI with SecureBoot.
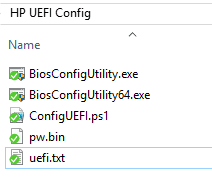
To make this fully operational more files are needed, these files must be added locally. If you’re an administrator with experience in HP computer this is hopefully enough information to get it working, this is a picture of a functional set of files:
As we prefer keeping bios config files on a network share the step looks like this at most of our customers:

Command: powershell.exe -NoProfile -ExecutionPolicy ByPass -File "%BiosShare%\%Model%\BCU\ConfigUEFI.ps1"
If your running Dell, Lenovo or any other brand – modify as needed. If you don’t have Powershell included in your boot images the script is useless and has to be replaced.
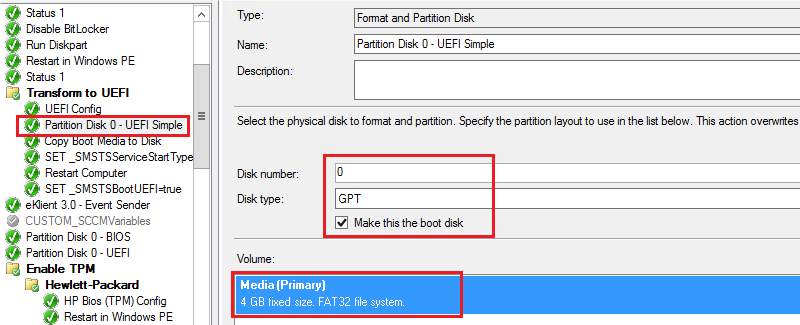
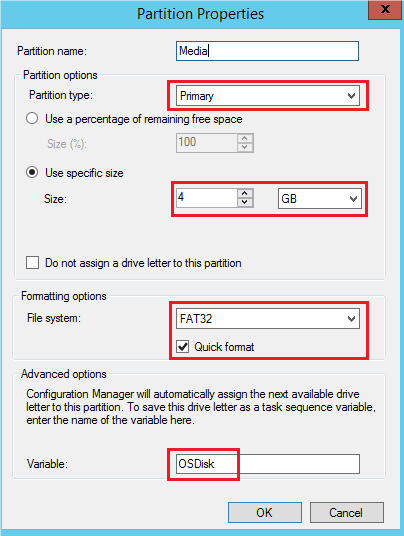
6.2.2 Partition Disk 0 – UEFI Simple
Use a standard “Format and Partition Disk” step to create a GPT disk with a minimal UEFI-compatible partition. The automatically assigned drive letter will be stored in “OSDisk”.
6.2.3 Copy Boot Media to Disk
This is a straight forward “Run Command Line” step that uses the media package and “copy.cmd” to copy the media (iso) content onto the new partition.
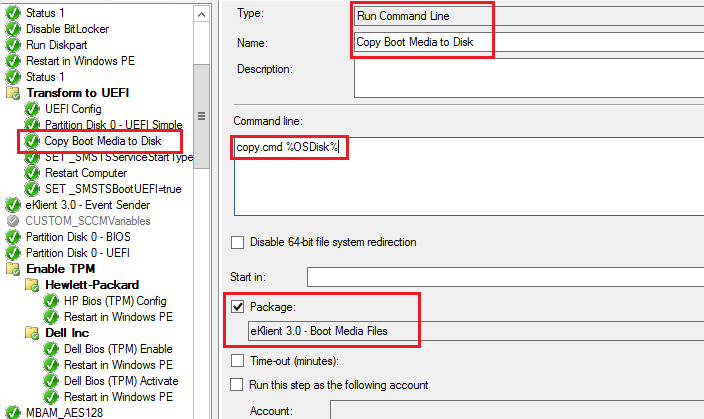
”OSDisk” contains the drive letter and tells copy.cmd where to put the content.
Command: copy.cmd %OSDisk%
6.2.5 SET _SMSTSServiceStartType=auto
Another “Run Command Line” step; that invokes TSEnv2.exe and sets ”_SMSTSServiceStartType” to ”auto”.

Command: TSEnv2.exe set _SMSTSServiceStartType=auto
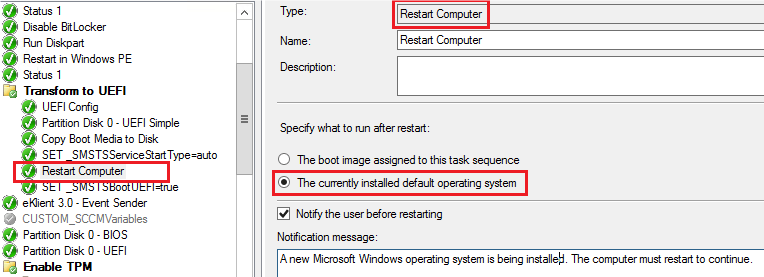
6.2.6 Restart Computer
Next we restart the computer using a standard “Restart Computer” step. Because of the previous modification of the read-only TS-variable we will now be allowed to reboot to the currently installed default operating system, e.g. our media (iso).
6.2.7 SET _SMSTSBootUEFI=true
Finally, we need to modify a second read-only TS-variable. When the TS started the computer was running “Legacy BIOS” and “_SMSTSBootUEFI” was set to “false”.
We need to correct that, as we are now running in UEFI mode.
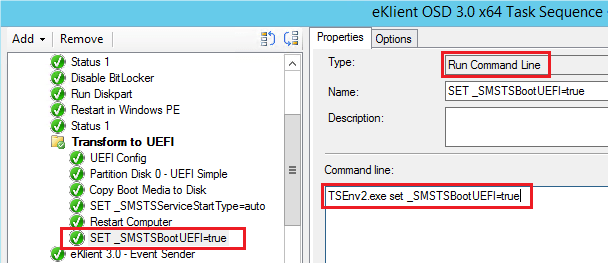
Command: TSEnv2.exe set _SMSTSBootUEFI=true
7. Done
The rest of the Task Sequence will execute as UEFI.


