
Zero Touch and Lite Touch
OSD is often broken down into two large categories: Zero Touch and Lite Touch. Both refer to fully-automated OSD processes. Zero Touch, as the name implies, requires no (or zero) interaction or intervention to successfully complete. Lite Touch on the other hand requires some limited amount of input from a human participant.
These terms are also often directly associated with the two Microsoft OSD tools: System Center Configuration Manager (ConfigMgr) with Zero Touch and the Microsoft Deployment Toolkit (MDT) with Lite Touch. The reason for this is because ConfigMgr provides very limited built-in facilities to enable any user input during OSD – some would even say that these facilities are so limited that they are effectively useless (for a quick overview of how to use this built-in functionality). Also, the design goals for OSD in ConfigMgr were for it to have no interaction and thus Zero Touch.
That’s all well and good, but ultimately, it’s also unrealistic for many organizations using OSD. To truly have a fully Zero Touch OS deployment means that either every system deployed is completely identical, all variations are predefined somewhere, or all variations can be automatically determined or derived. These variations can include many different items but common ones include Active Directory OU, time zone, language, system name, software to deploy and OS to deploy. Pre-defining or automating these variations can be challenging in most environments as it implies that standards exist for them, that they can be reliably predicted, and that nothing ever changes. Additionally, some of these variations rely on other factors that may not be known until the system is being deployed like who the intended user is or where the system will be used. Finally, each system deployed within an organization may be so unique, that automating a unique scenario for each and every system has no value.
Why Use a Frontend?
This is where OSD frontends come in. Frontends enable an interactive user to define or set a value for these variations at OS deployment time. The interactive user here could of course be a technician or an actual end-user – whichever works. Frontends generally present this user with a GUI that enables them to enter the required information. Based on this information, the task sequence controlling the OS deployment can in turn perform the necessary actions to apply or set those variations.
In addition to soliciting information used by the OSD process, frontends can also provide pre-flight checks to ensure the system is ready and suitable to receive a new OS instance before any destructive actions have been performed. Frontends can also present authentication and authorization to ensure that the user initiating the process is indeed supposed to be able to do so. Simple information messages are also useful and can similarly be displayed by a frontend. There are other possibilities of course also.
While the interactive GUI portion of a frontend is certainly the defining feature of most frontends, frontends can provide additional functionality including collecting information from other sources like the local system, a web service, Active Directory, or a database. The information can then be presented to the user, used to drive a variation, or some combination of these two.
Finally, frontends can include advance (or simple) logic that would otherwise clutter a task sequence making it more complex to maintain. Moving this logic to an external component like a frontend reduces this clutter, eliminates redundancy, and may also enable an organization to reduce the overall number of task sequences that they are using.
Ultimately, frontends are about making a task sequence dynamic and flexible without having to pre-define every permutation and also enabling the dynamic behavior to be based upon user input as defined at deployment time.
How Do Frontends Work?
Frontends work by populating task sequence variables. These variables are used by task sequences to perform various configurations, conditionally execute a task, or otherwise provide configuration information. Everything that a task sequence does is stored in a task sequence variable; in fact, the task sequence itself is stored in a task sequence variable.
Variables are set in a few different ways. The easiest is during a task sequence using the Set Task Sequence Variable task. Figure 1 shows an example of using this task. Although technically valid and useful, this method is essentially statically setting a value for all deployments of a given task sequence and thus is not typically pertinent to frontends.

A second way to set a task sequence variable is directly on a computer resource or collection within ConfigMgr using the console, the SDK, or PowerShell. Although a valuable way to set a task sequence variable, this way isn’t really pertinent to frontends either.
The final way to set a task sequence variable is heavily relied upon by all frontends. This method involves using a COM object to set the value of a variable. This COM object, Microsoft.SMS.TSEnvironment, is actually the only way to set or access the value of a variable – behind the scenes, the first two methods for setting a task sequence variable’s value actually use this COM object as well. This COM object is accessible from any COM aware development tool including VBScript, PowerShell, .NET, C++, AutoIT, etc. Table 1 contains links to pages for more detailed information on using the Microsoft.SMS.TSEnvironment COM object from the various development tools. Note that this COM object is only available during the execution of a task sequence or during the pre-start phase of OSD. Outside of these two times, this COM object is simply not available.
Table 1
| Development tools | Link |
| VBScript | https://msdn.microsoft.com/en-us/library/cc145669.aspx |
| PowerShell | https://powershelldistrict.com/how-to-read-and-write-sccm-task-sequence-variables-with-powershell/ |
| C++ |
By setting task sequence variables in the proper way, a frontend influences or controls the behavior of a task sequence. What exactly can be accomplished is more or less only limited by the creativity and skill of the developer creating the frontend.
Task Sequence Variables
There are many default task sequence variables; for ConfigMgr Current Branch (CB) these are fully documented at https://technet.microsoft.com/en-us/library/mt629374.aspx. These are broken into three types of variables: Action, Built-in, and Custom.
Action Variables
Each task within a task sequence has options that are set using the task sequence editor. Values set in the editor are set at design time and are stored as Action task sequence variables. These values are read in at the beginning of a task sequence’s execution and used to perform the task they correspond to. At any time after they are read in but before their corresponding task is executed, their values can be overridden. This is known as a run-time change. Run-time changes override design-time configurations of a variables value.
As an example, let’s say one of the variations we would like to set at deployment time is the OU of the system. The Apply Network Settings task already includes the ability to set the OU of the system being deployed. To make this more dynamic, you could add multiple instances of this task, each with a different OU specified and a condition so that only one actually is executed. This will needlessly bloat the task sequence very quickly though.
Instead, by simply including this task once in the task sequence and then setting the proper task sequence variable, OSDDomainOUName, to override whatever value was specified at design-time, we can maintain a simple task sequence and offload the logic to set the proper OU to the frontend at deployment time.
Built-in Variables
Built-in variables are those that control other behaviors during a task sequence that don’t necessarily correspond directly to an existing task or task type; e.g., _SMSTSBootUEFI which equates to true or false based upon whether the task sequence engine detected that the system is in UEFI mode. Built-in variables are automatically set by the task sequence engine at the start of the execution of a task sequence. Those whose names start with an underscore are read-only and cannot be changed. These read-only variables are still quite helpful as they allow our frontends to make choices or display information to the user.
Custom Variables
Custom variables are just that: custom. They can be used for anything that we want to use them for. Within the context of a frontend, custom variables are often set for use within a task that accepts a custom task sequence variable like the Install Application task or within a condition to dynamically determine whether a task within the task sequence should be executed or not.
Conditional Task Execution
Every task within a task sequence can be set to conditionally execute based upon the value of a task sequence variable – the type of variable or how it was set is irrelevant for this. To set a condition based upon the value of a task sequence variable, navigate to the options tab of the task you wish to be conditionally executed. Select the Add Condition drop-down button in the right pane and then choose Task Sequence Variable as shown in Figure 2.
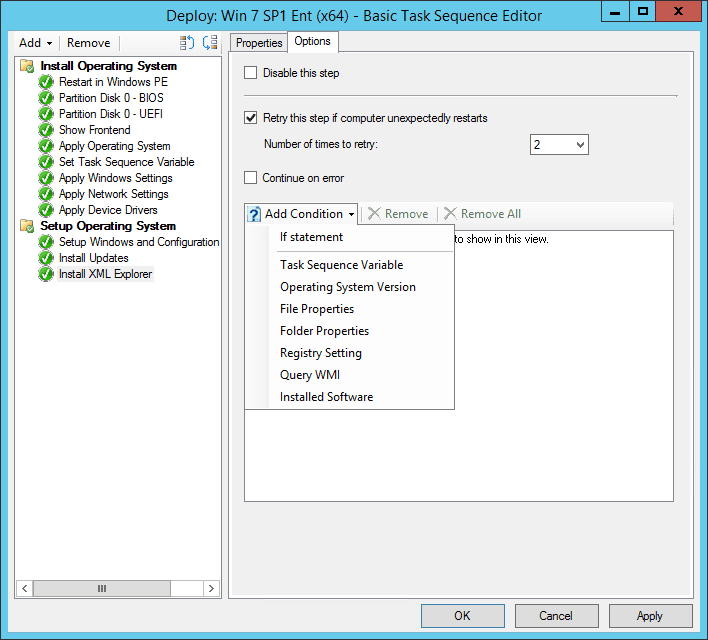
This will result in the Task Sequence Variable dialog as shown in Figure 3 where you enter the condition that must be true in order for the task sequence engine to execute the task. If the condition is not true, then the task will of course be skipped. In this example, the Install XML Explorer task will only be executed when the task sequence is run if the InstallXML task sequence variable equals the value true. How this variable was set to true is irrelevant as long as it occurred before the task was executed using one of the methods described earlier for setting the values of task sequence variables. In the context of this article, this was presumably set by the interactive user answering a question, selecting a checkbox, or providing some other input to the front end displayed to them by the Show Frontend task that occurred earlier in the task sequence (as also shown in Figure 2).

As noted, this can be done for every task as necessary and one of the key activities for creating a dynamic task sequence as well as one driven by user input provided using a front end.
You can now read the second blog in this series, where I cover How to Use a Frontend and three different methods for launching Frontends in ConfigMgr OSD.


