
In our recent webinar on automating the switch from BIOS to UEFI, Mike Terrill demonstrated the process of performing a wipe-and-load migration to Windows 10 (required when switching from BIOS to UEFI) that preserved the user data and settings using the Peer Backup Assistant feature of 1E Nomad. A number of questions were raised about this particular feature in the Q&A session at the end, so this article is aimed at addressing them all together. We have also published a blog that answers the questions specifically relating to the 1E BIOS to UEFI technology. Miss the live broadcast? You can watch the webinar on-demand here.
When refreshing or replacing the operating system on a user’s device, you will probably want to save and restore their files and settings. You can use the Capture User Files and Settings and Restore User Files and Settings steps in a Configuration Manager Task Sequence to achieve this. These steps execute the Microsoft User State Migration Tool (USMT) behind the scenes to actually carry out the backup and restore of user data.
In some cases, if the disk is not encrypted and does not need to be re-partitioned, USMT can use hard links (by checking the Capture locally by using links instead of copying files option in the Capture User Files and Settings step), which allows the user state to be stored safely on the local disk while the old OS is deleted and the new image installed.
When hard links are not an option
However, when the disk needs to be re-partitioned (as required when switching from BIOS with MBR to UEFI with GPT), using hard links is not an option as no data on the disk can be preserved when the disk is re-partitioned. In this scenario, you need to store the USMT data off the device. Normally this would require a State Migration Point, but the 1E Peer Backup Assistant (PBA) feature enables this data to be stored temporarily on one or more local peers and restored from one of those peers after the disk has been re-partitioned and the new OS image installed.
So how does Peer Backup Assistant work?
The Peer Backup Assistant is enabled on whichever devices you want to use to temporarily store user data. You can configure how much disk space you want to allocate for the storage of USMT data on each of these devices. To use the Peer Backup Assistant feature, you add the 1E Peer Backup Assistant steps into the Capture User Files and Settings and Restore User Files and Settings groups in the Task Sequence.
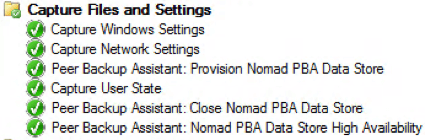
The first step is Provision Nomad PBA Data Store. This finds a local peer that has the PBA feature enabled and sufficient allocated space to store the user state from the device. (The step includes a parameter for the estimated required space, which can use the USMTESTIMATE Task Sequence variable if you are using an MDT-integrated Task Sequence). By default this step will find a peer on the local subnet, but you can configure Single Site Peer Backup Assistant to locate and use PBA storage on adjacent subnets. When this step locates a suitable peer, a new file share is created on the selected peer and the OSDStateStorePath Task Sequence variable is set to the path of this share.
What happens if the peer goes offline?
The Capture User Files and Settings step is executed after the Provision Nomad PBA Data Store step and uses the OSDStateStorePath as the destination for the USMT savestate action, so effectively we’re just redirecting the output to a local peer. PBA has no control over this process – if the selected peer goes offline while the user state is being backed up, the task will fail. You can capture this failure in the Task Sequence and either exit (so the new OS is not installed but user data is safe), or include a ‘repeat on failure’ group that reruns the Provision Nomad PBA Data Store step to locate an alternative peer then rerun the Capture User Files and Settings step.
Is there just one copy of the user state?
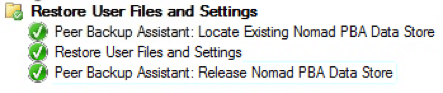
Peer Backup Assistant includes a High Availability option that enables additional copies of the content to be made on other peers once the initial USMT backup has competed. (This is done by adding the Nomad PBA Data Store High Availability step that specifies how many addition copies you want to make after the Capture User Files and Settings step has completed). If this option is used and the peer goes offline during restore, you can create a ‘repeat on failure’ group of steps that re-runs the Locate Existing PBA Data Store step to find one of the other copies then rerun the Restore User Files and Settings step.
How is the user data secured on the peer?
A new file share and local user is created on the selected peer for each device storing data on it. By default, Authenticated Users have access to the share, but this can be locked down to just the internal, local Nomad user accounts. By default, local NTFS permissions on the selected peer will enable users to view the .MIG file created by USMT, but again these can be locked down according to your requirements. USMT also enables the data to be encrypted if you want to protect the data further. After the client has successfully restored the user data from the peer, the Release PBA Data Store task in the Task Sequence will remove the data from the peer, so the data is only stored temporarily on the device until it has been successfully restored on the client being rebuilt.
To learn more about how 1E address all the challenges of migrating to Windows 10 through automation, please visit https://www.1e.com/solutions/windows-10-now/


